Table Of Contents
Introduction
This method is almost identical to the first method. However, it works with specific types of proxies that offer the VPN protocol. The proxy companies I tested are: MobileHop and ProxyGuys. Nevertheless, on your way you may meet other 4G/5G companies that will be offer the VPN protocol and the Softether/Open VPN profile, so it is worth describing the use of this method. This is the simplest connection setup method.
Unfortunately, the proxies offered by MobileHop are simply expensive.
I use them myself, but I don’t buy a package for the whole month. I shoot videos first, then buy a two-day package for $16.
In two days I upload a video to TikTok and I don’t buy an expensive monthly package. Maybe this is the solution for you?
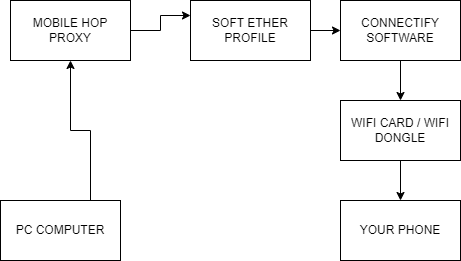
To use this method, you must first of all have: SofEther/OpenVPN 4G Proxy and a WiFi USB card.
The core of this method is that we don’t set our proxy directly on your phone. There is a risk that the TikTok application will bypass proxy settings, and it will certainly be informed that
you are using a proxy. On both iPhone and Android devices, a developer can easily discover that you are using a proxy. It’s just a few lines
code and I doubt TikTok would not use this functionality. Even I, when I was an Android application developer, was detecting my users proxy connection.
This applied to a cash reward application. I just detected cheaters with a few lines of code. Then it was also possible to force Android to switch
connection without proxy. Right now with Android version 10+ it’s much more difficult but still doable. This is also possible on iOS devices.
In addition, since Android 10+ (excluding Samsung devices), the ability to authenticate the socks5 proxy has completely disappeared. You need root to do this, but don’t worry
none of the methods in this course assume the use of root. All we have to do is to prevent Android apps from detecting the proxy. The most effective method is to set
our proxy on the computer, and then forwarding the connection via the wifi card to our phone. By doing so, applications will lose any ability to detect the proxy.
Especially when you use 4G proxies from many providers, which you will find e.g. on the BHW forum. Thanks to that, you will have a clean connection and TikTok will think you are a user
from another country.
TUTORIAL IS CHANGED CONFIGURATION METHOD 1, SOME THINGS CAN BE REPEATED
NOTE: IF YOU USE WIFI ON YOUR COMPUTER, ONE WIFI CARD IS NOT ENOUGH! YOU NEED TWO WIFI CARDS:
a) Your main card through which you connect to the Internet
b) Your second card, thanks to which you will transfer the call to the phone
You will need some programs to make this connection:
-in the second method, we use the SoftEther
-you will need MyPublicWifi or Connectify to transfer the call, I personally use MyPublicWifi. It is not very stable compared to its competitor, but
it seems to me that a competitor is stealing the connection to use in their paid VPN. I recommend testing two programs.
Simplified information what we are doing here
- We are getting the Soft Ether VPN profile from 4G provider, here we done it with Mobile Hop
- We are importing profile to Soft Ether Client program
- Then we are setting up the hot spot with MyPublicWifi program
- We are broadcasting Socks5 proxy to wifi card
- Don’t forget about DNS leak
- Once you connect your phone to hot spot, your IP on phone will be the same as 4G
Software Configuration
After downloading and installing the required programs, you need to make sure that your WiFi USB dongle is connected to your computer. First, let’s configure SoftEther.
HOPE YOU ALREADY HAVE MOBILEHOP PROXY OR ANY PROXY WITH SOFTETHER PROFILE:
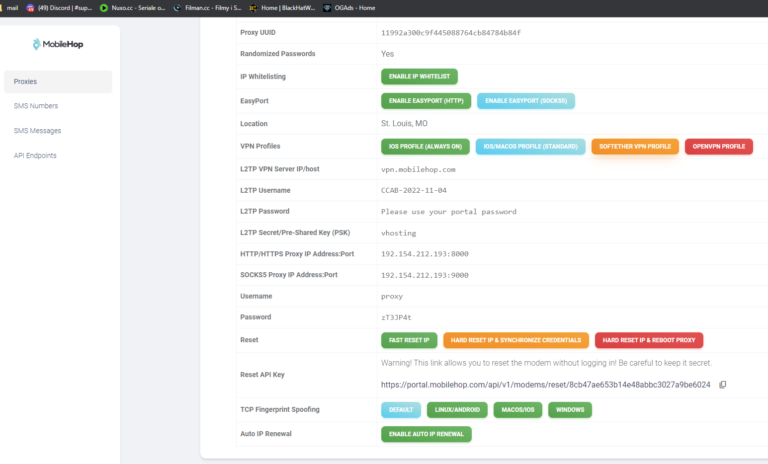
We are downloading Soft Ether Profile from Mobilehop dashboard (or any proxy provider that offer this profile)
Then we are importing the profile to Soft Ether client:
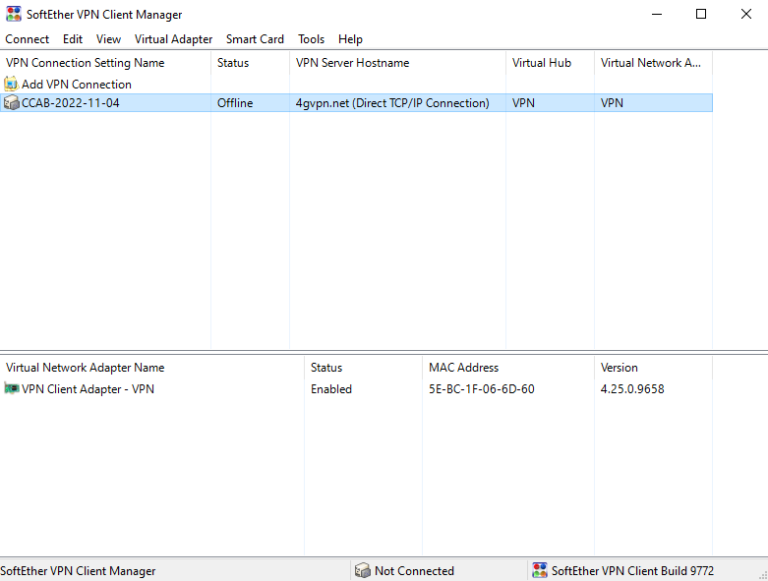
Once we have profile imported, we are clicking “Connect” in Soft Ether Client
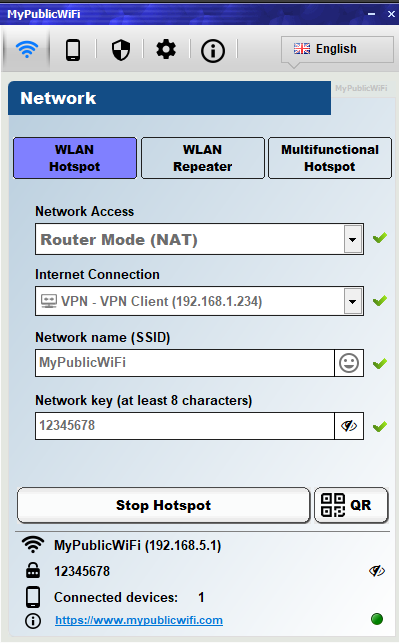
The next program that we need to configure is the MyPublicWifi program. Start the program, sometimes it takes quite a long time to start (up to several minutes). An alternative is the more stable Connectify program, but you will have to configure your connection yourself.
After starting the program, you will see a window like this. You must have identical settings. However, in the “Internet connection” field, you must select SSTAP
- When all options are green, you can connect to your wifi. However, this is not the end of the configuration. You still need to take care of DNS Leak
DNS Leak
DNS Leak is a problem that we encounter when using SSTAP programs on our computer.
Thanks to this, both Google Play and the TikTok application can easily detect our original IP or location.
I personally experienced this:
a) the Google Play application did not want to connect, logged out of the Gmail account and reported “unusual behavior” of the user, applications did not want to be downloaded from the store
b) the TikTok app had a completely different For You Page, the videos were general, American, but also global. After the DNS Leak was patched, the FYP site was completely different:
-if I had a 4G Proxy from Dallas, the videos were from Texas
-if I had a 4G Proxy from Los Angeles, the videos were from California
This app behavior didn’t show up unless I patched DNS Leak. You could say I had fake US targeting. Admittedly, before patching DNS Leak, it showed me American video on the FYP list, but TikTok just knew it wasn’t my location. There is one more difference before patching DNS Leak. Uploaded videos gained views after 1h-8h, and after solving the problem, views appeared after only 20-30 minutes!
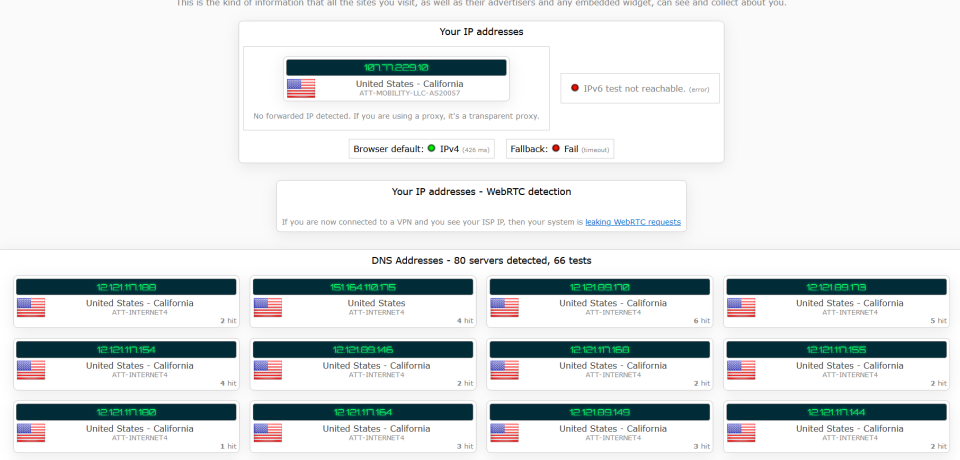
How to check if we have a DNS leak? It’s easy, go to the website:
https://ipleak.net/
Even after proxying, DNS Leak will show your original country!
Your goal is to achieve this status:
How to fix DNS leak?
- Go to the Control Panel.
- Click Network and Internet > Network and Sharing Center > Change adapter settings.
- Select the connection for which you want to configure Google Public DNS
- Right click on the connection
- Choose properties
- Choose IPv4 protocol
- Set up custom DNS
- On previous Window disable IPv6 Protocol - this is most important, because IPV6 is leaking location
- Repeat on every adapter: ethernet, wifi, sstap program! Each network card adapter should have that DNS
Look at screenshot:
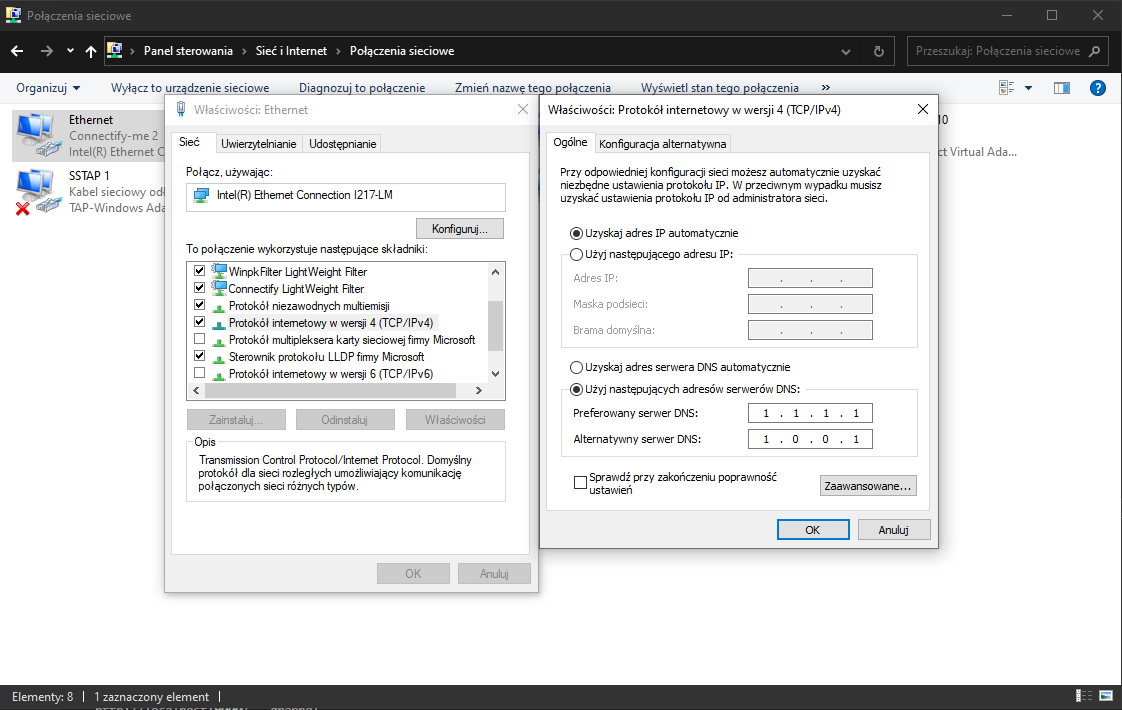
As you can see on the screenshot. I have DNS set up for IPv4 protocol and disabled IPv6 protocol completly.
PLEASE NOTE IF YOU LOOSE INTERNET CONNECTION, YOU CAN RESTORE IT EASILY BY RESTORING DNS settings. IPV6 DON’T NEED TO BE RESTORED
Settings Video
Troubleshooting
Q. Sometimes MyPublicWifi don’t want to connect
A. Disable network cards that you are not using, for example that belongs to VPN you are not using.
MyPublicWifi is not stable software. It’s running slow when you launch it. Alternative is Connectify.me but they have slower connection
Q. My connection is stopped. No internet on phone
A. Reset proxy, reset MyPublicWifi - proxies sometimes loose connection. Reseting connection is your new friend
Q. No matter what I don’t have internet connection
A. You need to go to network adapter settings, right click on Properties and click “Share”, share your connection to wifi card
Q. I have other problems with connection A. This is your Windows problem, specific to your system. Fix your system first, test on different PC. Then contact me on Telegram @lukemat and ask
What’s next?
Once you have tested everything and you have connection and DNS leak fixed, you can continue to the phone configuration: https://tikmethod.com/create-tiktok-accounts/
Tutorials are for Windows. I have Mac or Linux, what now?
Well, for Mac and Windows there is a solution but it’s harder to configure.
Here is the instruction:
https://crosp.net/blog/administration/routing-network-traffic-through-socks5-proxy-using-dd-wrt/